How to Fix Leaking Bathtub Faucet

Instructions to Fix Leaking Bathtub Faucet

Spilling Bathtub Faucet is baffling, and now and again it endures us from numerous points of view, one of which is going through cash when you are not in an appropriate circumstance for it. That is the reason we have explored a little about how to fix spilling bath spigot, which may set aside you cash and time both.

Reasons for a Leaky Faucet

There are a ton of causes that cause a spigot spill. In the event that you deal with the pipes arrangement of your home on a customary time frame, you probably won’t face this troublesome time yet on the off chance that you are confronting, for instance, this just because you need to dive deep into the causes that have grieved you and not to take part during circumstances such as the present once more.

The main causes of a leaking bath-tub faucet are:

● Ravages of time
● Depletion of Minerals in the Faucet
● Corrosion and rusting
● Loosen Parts

Required Tools

➢ Shower SocketWrench
➢ Wrench
➢ Philips Screw Driver
➢ Flathead ScrewDriver
➢ Hair Dryer (not a Necessity)

Caution

Ensure that during the entire procedure of this leaking bath-tub faucet fixture, you need to place each and everything in a compartment with the goal that you would not lose any of it. Additionally, you need to recall the request in which you should reassemble the fixture; else, you could get yourself in a difficult situation.

VISUAL GUIDE:

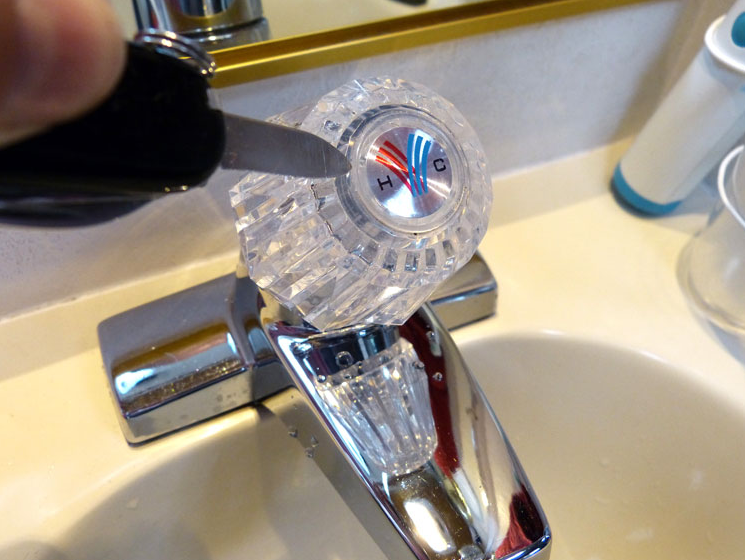
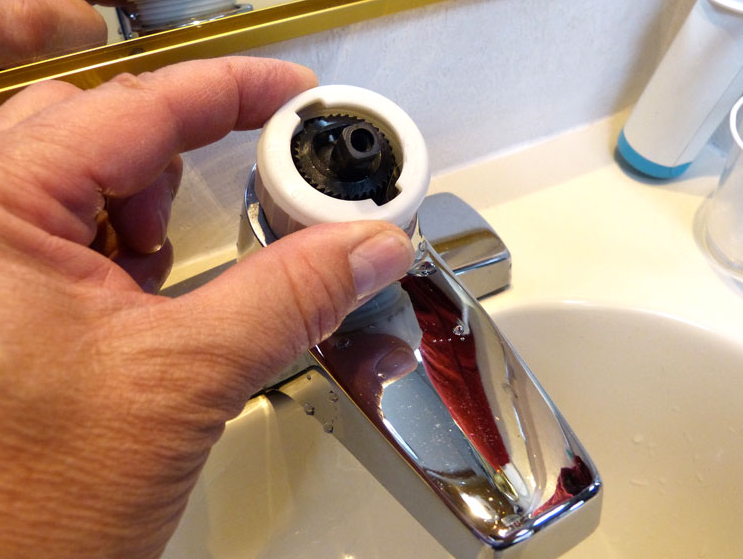
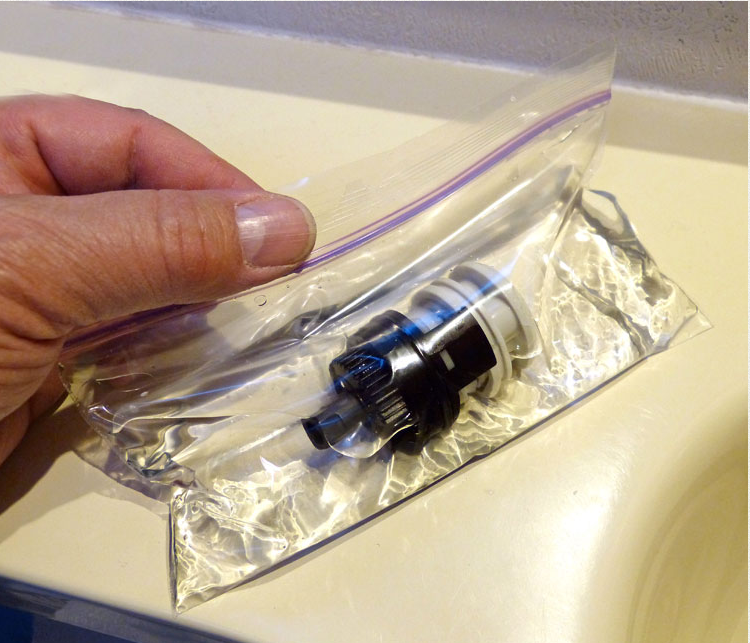
The discussion above how to fix the leaking bathtub faucet was all descriptive, and as you know, there was no visual guide given to help you out. We thought that it would be enough for you, but we received a couple of emails that they also need some visual help, so we decided to include it as well. I hope this visual guide will add glory to your problem-solving.
We are going to do it in many steps, like in our previous discussion, to avoid complexity.

STEP 1: REMOVAL OF THE CAP

The first step that you need to do is to remove off the cap of the handle ring. In most of the faucets, this cap is made up of plastic material, so you have to be very careful to remove it. The best way that you can remove it safely is to use the pocket knife.
Make some space in the handle socket for the pocket knife while being careful during the process all the time when you have created enough space for the knife to pop-out the cap and place it somewhere safe to put it back into the socket of the handle ring.

STEP 1: REMOVAL OF THE CAP

STEP 2: REMOVAL OF THE HANDLE SCREW

After you have removed the cap of the handle ring of the faucet, now it is time to loosen off the screw that lies within the socket of the handle. Again we have to remind you that after its removal, keep it somewhere safe along with the cap and every other part that you are going to remove in the next steps.

STEP 2: REMOVAL OF THE HANDLE SCREW

STEP 3: REMOVAL OF THE HANDLE RING

The handle ring by now is loose, and you can remove it by applying some force with your hand toward you. If you face any problem removing it with your hand, try some unique hand puller tool. That way, it would not break and would not cause any problem for you.
Now turn the handle post clockwise with the tool and loosen it off.

STEP 3: REMOVAL OF THE HANDLE RING

STEP 4: REMOVAL OF WHITE INSERT

You probably do not have to worry about this step as this part is not present in most of the faucets. But if it is there somewhere in your faucet, it is below your handle ring. This white insert is a very delicate part of your faucet, and you should remove it off with ease and gentle force.
Now this time, you do not have to use any tool as you can remove this part of your faucet with your bare hands, but after this white insert, you have to very attentive as that would be the real parts that need fixing.

STEP 5: REMOVAL OF VALVE CARTRIDGE

Valve Cartridge is where your bathtub faucet is leaking from, and you need to fix this part right way. If you can set this part very well, it is worth giving a try, but in most cases, this part needs exchange, and you can easily find it in any hardware store.
You can use a plier for the removal of the valve cartridge. This way, you can enhance it by rotating the handle of the valve cartridge counterclockwise.

STEP 5 REMOVAL OF VALVE CARTRIDGE

STEP 6: RINSE OFF THE VALVE CARTRIDGE IN VINEGAR

If you are looking forward to fixing it yourself, the best way to do it is to wrap up in a small plastic bag and soak it in vinegar for about an hour or so. After that, rinse off the valve cartridge with freshwater and reassemble it following all the steps in the backward direction.

STEP 6 RINSE OFF THE VALVE CARTRIDGE IN VINEGAR

FINAL WORDS:

Fixing of a leaky bathtub faucet by yourself is a tricky process and you, either, have to be a plumber to fix a leaky faucet or you need a guide to make it right. This was a small effort for you if you can not afford a plumber and want to fix your leaky bathtub faucet by yourself.
The other thing that we want you to make sure of is if something goes on and you are not able to fix it. You need to stop right away and call a professional plumber.
We also do not claim, any of the processes mentioned above, a hundred percent success while you do it but it is worth a try.

PRO TIPS:

You are reading this article because you do not know how to fix a leaky bathtub faucet. This means that you also do not know about how much and which part of your leaky faucet should get tight.

THE RIGHT TIGHTNESS:

We do hate to say it but your faucet may become leaky again after some time and you have to repeat all of the processes mentioned above. For this reason, you need to tight very screw and every part of your faucet in a way it will not bother you in the future if it needed any therapy again.

ELIMINATE THE FAUCET:

If you have more than one faucet connected to your bathtub and you want to know which bathtub faucet is leaking then you need to check the drips whether they are hot or cold. This will give you an idea about which faucet is leaking and then you can fix it with disturbing any of the other facets that do not need fixing.
If you find this article helpful we would love to hear from you and share it with your friends.
Cheers…..

Leave a Reply

Your email address will not be published. Required fields are marked *